Category Archives: Google Earth

Family History + Google Earth = A Great Partnership, Part 3

Today’s mini-lesson is on using historical maps on Google Earth. Google Earth should be installed, but you also need a digital image of a map. If you don’t have any map images, the David Rumsey Map Collection is a good place to search first. If you have an exact address where someone lived, choose that town first and see if there is a plat map that shows landowners that includes your family’s name.

You can also do an Advanced Google search and put in “plat map” along with the place name and see what hits you get.

I have a book titled Atlas of Washington County, Maine, Compiled, drawn and Published from Official Plans and Actual Surveys by George N. Colby & Co., Houlton and Machias, ME 1881. In it is a map showing Calais, Maine and environs. My 3x great grandfather, Thomas Coleman, is one of the names on the map and the location of his property is marked. I am going to use this map as an example and I scanned part of the page, saving it as a jpg.

1. When you have a digital map image saved, open Google Earth and fly to that place. I flew to Calais, Maine:

CalaisME1881MapScreenShot
Calais, Maine on Google Earth

Calais sits right on the St. Croix River, which borders New Brunswick, Canada. That is why this map has the yellow line zigzagging through it.

2. Next, look at the top menu bar on Google Earth and click “Image Overlay.” It is the 4th icon from the left, not counting the blue “Hide Sidebar” icon. A new image overlay box will open on your screen:

ImageOverlayScreenShot
New Overlay Image Box

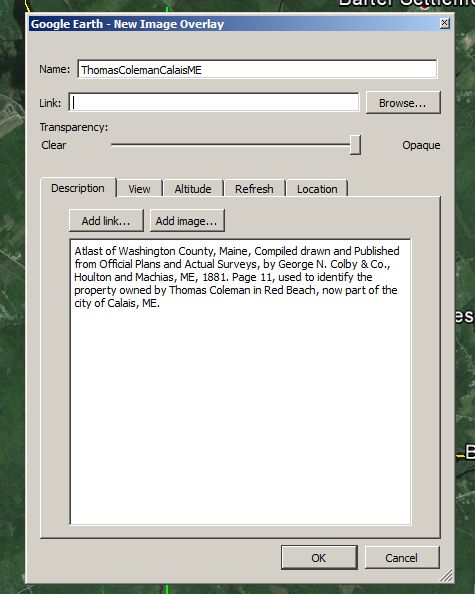
3. Name your image and, if you like, write a short description about it and/or the source. I included the book citation and the fact that it is Thomas Coleman’s land because I have many other family members who lived in Calais. NOTE: After you open your image following the directions below, DO NOT click “OK” at the bottom of the box yet.
ImageOverlayBoxDescriptionScreenShot
Map Source and Description

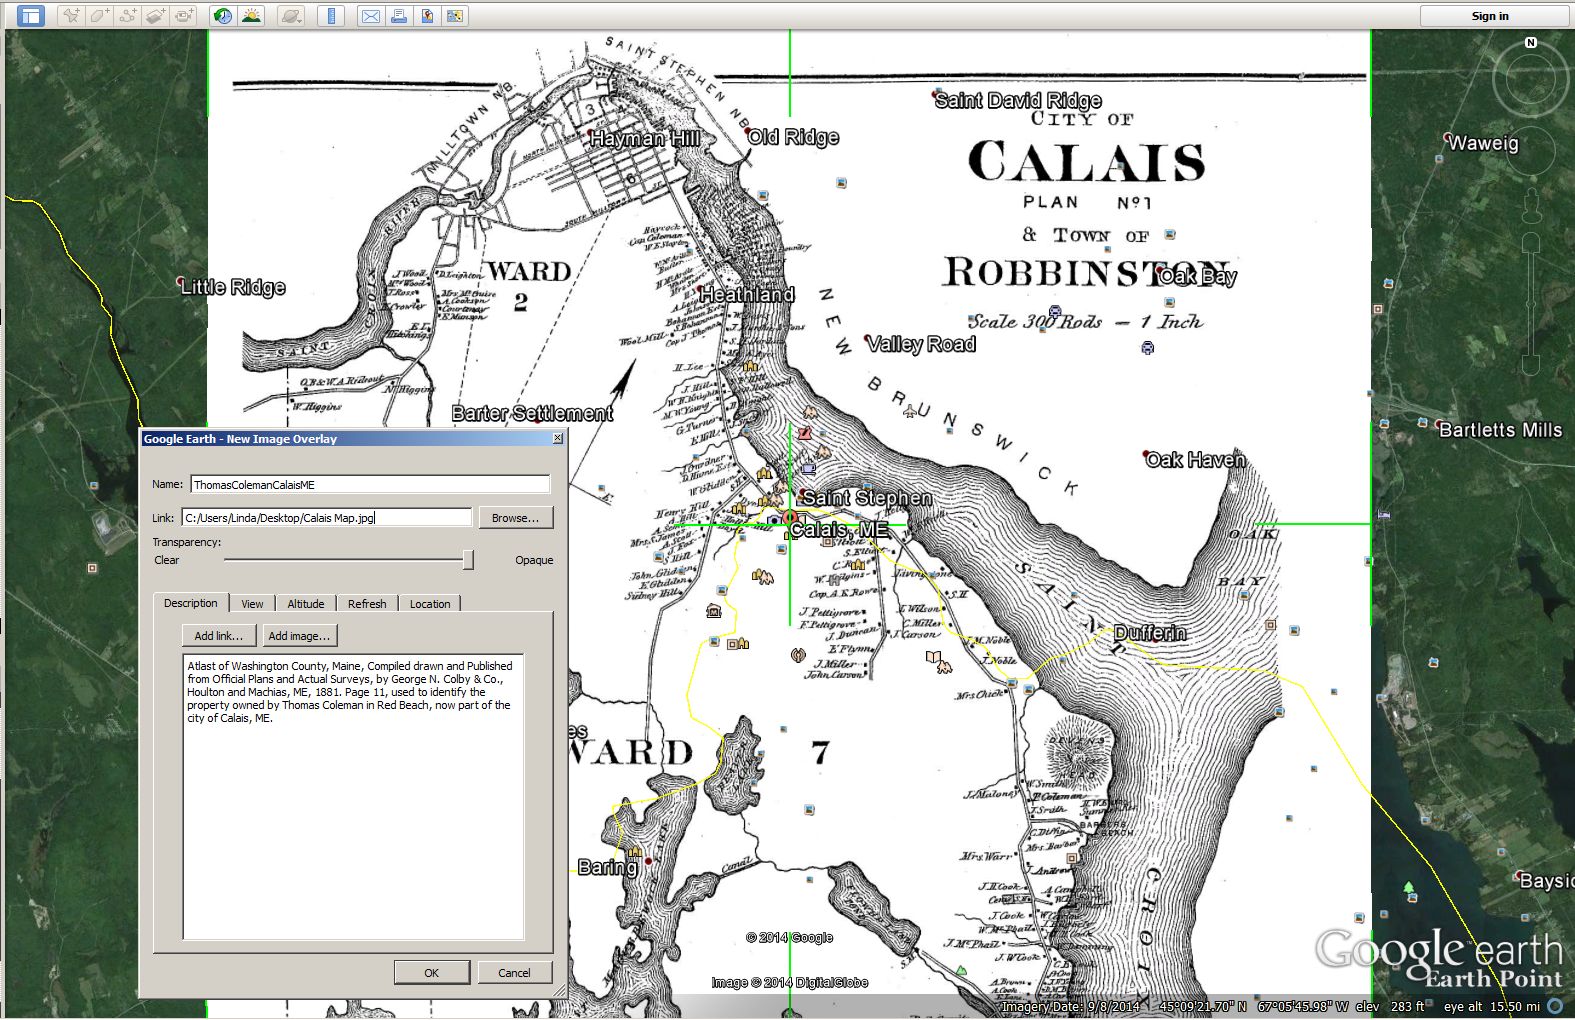
Notice that the link box is still empty. There is a BROWSE button to the right of the Link box. Click on BROWSE to find the map image on your computer and click to open. DO NOT click “OK” at the bottom of the box, as we are not yet finished.

Your screen should look something like this:
Overlayand MapImageScreenShotBox
Map Image Plus Overlay Description Box

4. Notice that in the gray box, below Link location box, there is a Transparency slider that ranges from CLEAR to OPAQUE. Right now, it is all the way over towards OPAQUE, as far as it will go.

Move your mouse onto the top of the gray box and drag it over to the left so you can see all or most of your map. If you prefer, you can also close your sidebar so that the map fills the screen. I like keeping mine open.

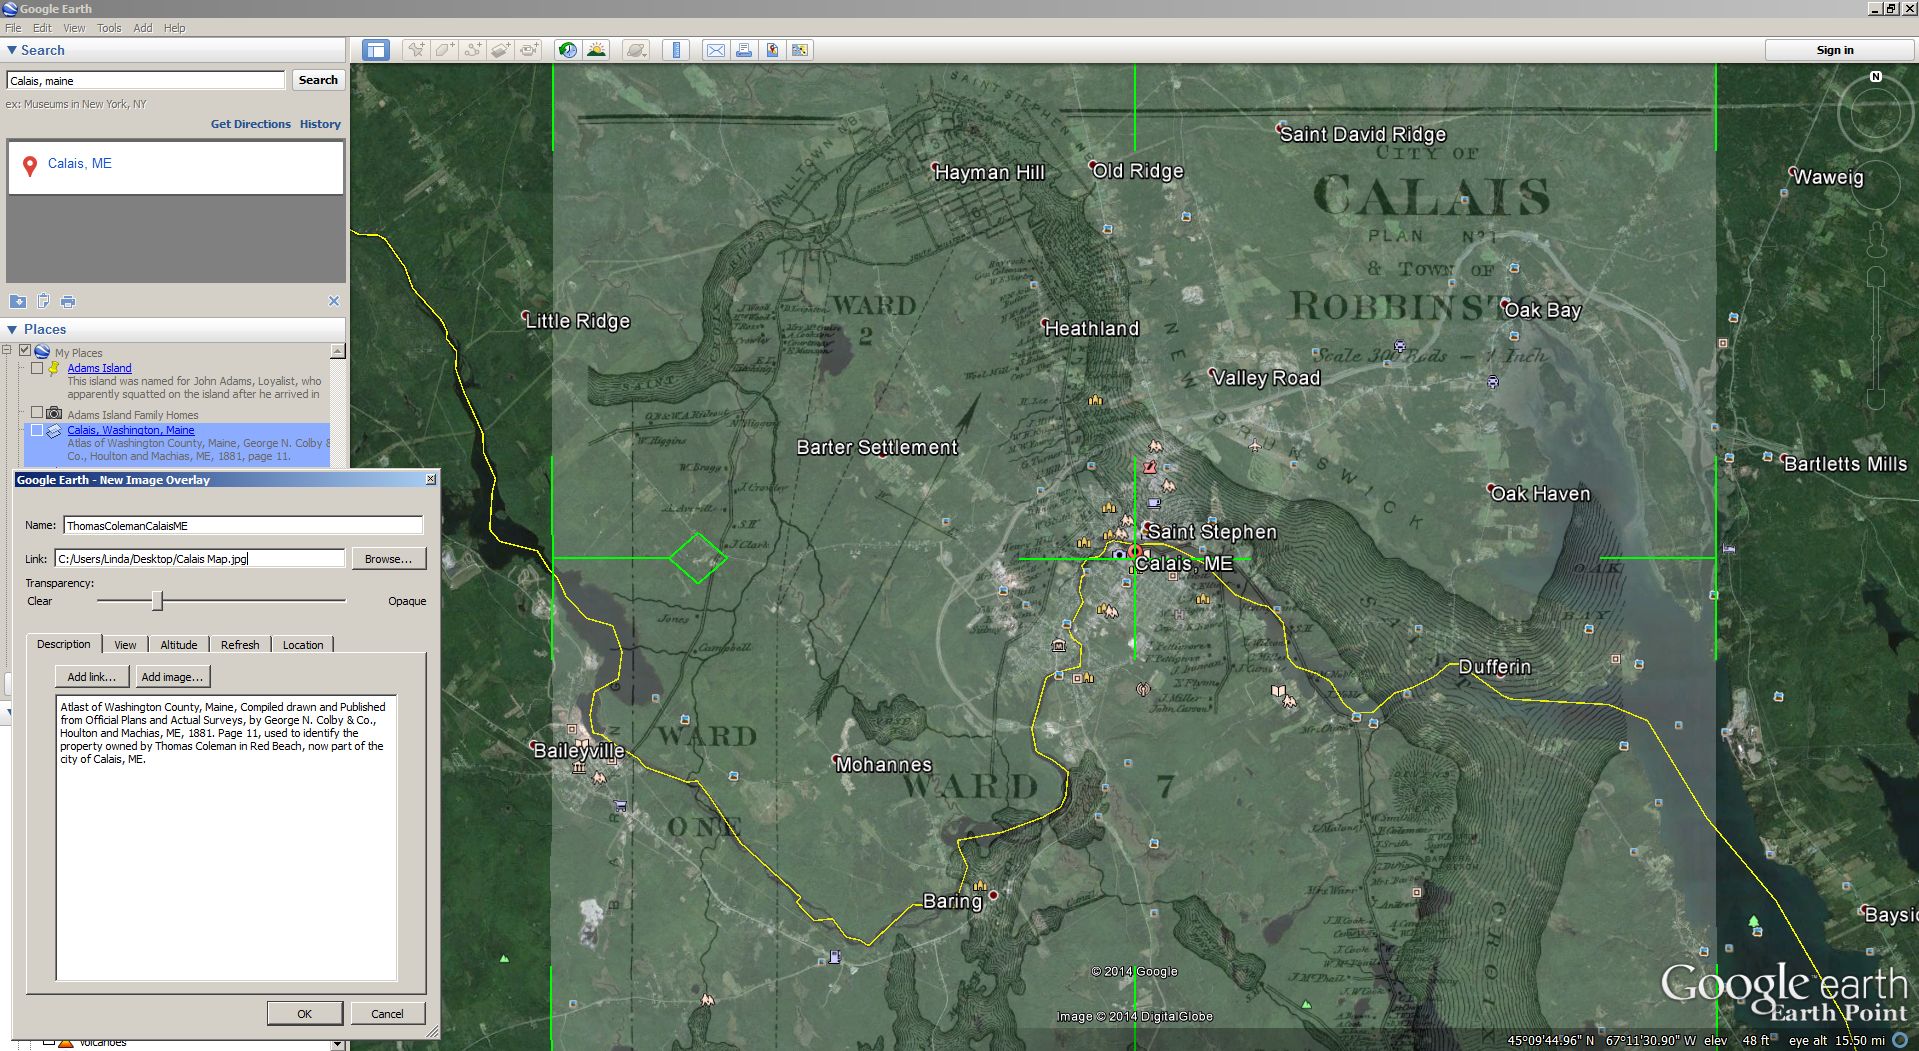
5. Next, move the Transparency slider in the gray box to the left. Play with it a bit to see how clear or how opaque you can make your map. You are going to manipulate your map so that your image lays correctly on top of the Google Earth map. I find that the transparency slider is best set about 25% across the bar so I can see enough of my own image to try to match it to Google Earth.
TransparencyBarversusMapScreenShot
Transparency Slider Set About 25% of Way
Across the Bar

There should be a green cross centered over your town. Mine is over downtown Calais.

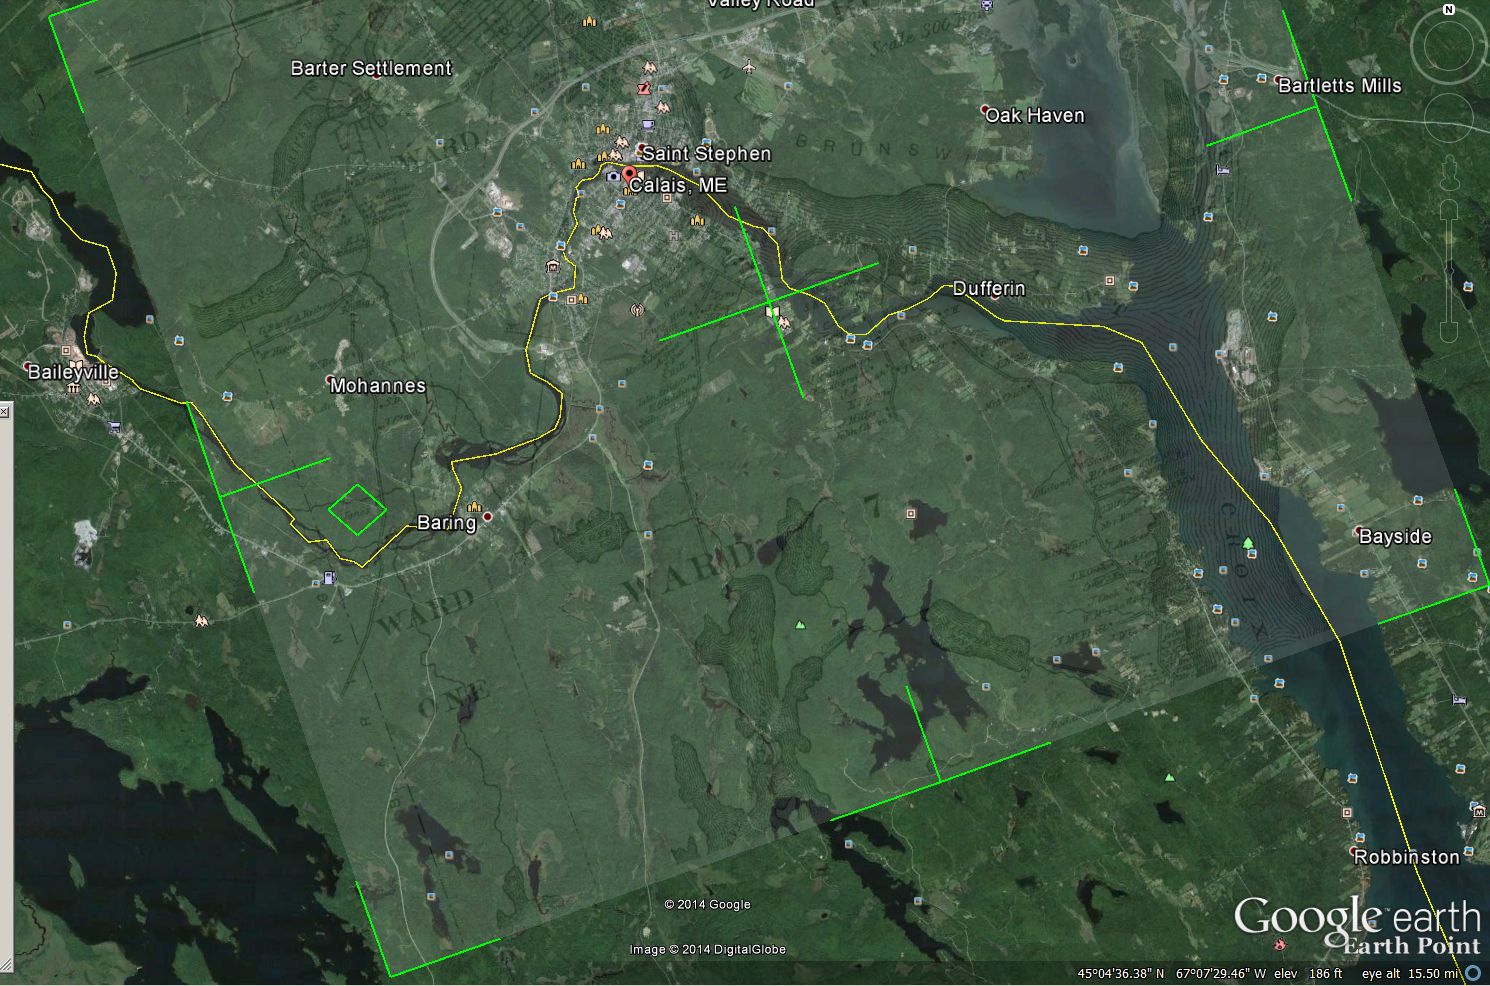
6. Now it is time to match up streets, waterways, major highways, geographic points or whatever major points are found on your individual map. Because Calais sits on the St. Croix River and Red Beach goes down the Atlantic Ocean coast, I am going to use the curves of the land and waterways to align my image on top of the Google Earth map.

Touch your cursor to the middle of the green X to move your entire map image north, south, east or west. On the left side of the image, there is a diamond shape. Once you have the whole map set where you want it, put your cursor in the diamond box to rotate the map. You can move back and forth between the X and the diamond to adjust your map until you have it lined up as well as you can.

Some maps will match Google Earth exactly because they were surveyed correctly to scale. The map I am using of Calais is approximate, as you can see that the actual coastline doesn’t entirely match up to Mr. Colby’s drawing. This is about as close as I can get the maps to match up:
AlignedMap&ImageScreenShot
Aligned Image and Google Earth

If you are using a city plat map, you will be able to align the streets exactly. I used the Transparency slider bar to make my image more opaque. I also added the red arrow to point out “T. Coleman.”

RedArrowTColemanLand
T. Coleman Land – Red Arrow

This is important to me because Thomas died in 1888, wife Mary in 1889 and son William inherited the property. William died in 1905, but his wife, Sarah, survived until 1930. One of their sons, my great grandfather, Hartwell T. Coleman, ran a small store and gas station near the family home in Red Beach until the 1930’s. I even have a photo of the store, which I will use in another post.

From this map, I can see right where Thomas’s land is and the approximate distance from modern day Calais.

7. Now to SAVE the overlay. When the overlay is aligned the way you want it, click the OK in the gray image description and link box.

Go up to the Google Earth menu bar and click on FILE. Choose SAVE and SAVE AS. Save your file to the place of your choice on your computer.  It will save as a KMZ file, which is the format that Google Earth uses.

8. What if you don’t want to see your map all the time? Easy! Look at your Places box on the left side of the screen. The file you’ve created and named – for me, it’s “ThomasColemanCalaisME” is highlighted in blue.

There is a small box to the left that is checked. If you only want to see the Google Earth map, just uncheck the box and your overlay will disappear. Check the box and the overlay will reappear.

Tomorrow, I will explain how to add an image to your Google Earth map.


Family History + Google Earth = A Great Partnership, Part 2

Yesterday, I started to explain using Google Earth for family history research. I am definitely not a Google Earth expert – in fact, I am much more at the beginner level, but I am learning as I try to explain the steps to my readers so that is a good thing!

Today’s lesson is super easy. You need to have Google Earth installed for this to work. Do you have any land deeds for property that your ancestors owned? If you don’t have a copy of the actual land deed, do you have the legal description if it is the Township, Range and Section format? That’s all you need for this – Township number, Range number and Section number of the property.

If you aren’t sure if your ancestor owned property, or if you know they did but don’t know the township, range and section number, there is an easy way to find that information out and it’s FREE!

The Bureau of Land Management (BLM) General Land Office (GLO) has a Records Automation website.

Right below the photos, on the top left, there is a link to “Search Documents.” Click on that. A search screen will open:

Most people are going to search by location and name, but if you have a land description for your ancestor and find that he/she was not the first owner of the land, you can enter the land description to find the name of the original patent owner.

If your ancestor had a common name, you might have to wade through multiple listings to discover which person is yours. I am going to search using “Sturgell,” which is the surname of my husband’s black sheep great great grandfather. He lived in several places, but I am going to search in Missouri because I know he lived there over a period of time.

For now, all you need for this lesson is the township, range and section number of your ancestor’s property. Isaac Sturgell’s land was in Township 21, Range 25 and Section 23.

Next, go to Earthpoint at http://www.earthpoint.us/Townships.aspx. You don’t need an account to use this feature on the website. On the Earthpoint home page, scroll down to where it says “Convert Township, Range and Section to Latitude and Longitude.”

Here is a screen shot of part of the home page screen. The line you want is near the bottom here, but if you are looking at the actual home page, it is about 2/3 of the way down:

“Convert Township, Range and Section to Latitude and Longitude”

The new search box will open up.

Enter township, range and section numbers

I entered Missouri for the state and then T21, R25 and S23 for Isaac Sturgell. Don’t worry about the N,S,E and W directional letters after the township and range options. Just put in your numbers. Instead of clicking on “View,” choose “Fly To On Google Earth.” (Remember, you must have Google Earth installed for this to work.)

Isaac Sturgell’s land was either in the town of Golden or perhaps just outside it as I don’t know where the town limits are. The larger yellow box is the outline of that portion of land marked off to include Township 21.

I put a Placemark on Isaac’s land and saved it in My Places on Google Earth.

How easy was that?

Family History + Google Earth = A Great Partnership, Part 1

UPDATE: This is a multi-part mini-tutorial. Part 2 is coming on Monday, January 19.

I first mentioned Lisa Louise Cooke’s program on using Google Earth in conjunction with family history research back in October, but this is the first chance I’ve had to relearn what I’ve forgotten and talk about it.

Google Earth is a lot of fun to use with family history information. First, if you don’t already have it installed on your computer, do that now.

Once it is installed, you are ready to go. Choose a place to search for – one that has a special meaning for your family. It can be an exact address, such as a house where the family lived or it could be a place, like a church the family attended. However, do no choose an area that is a gated community or an uninhabited place for this practice. Google doesn’t enter such areas and you won’t be able to use the street view icon.

Your home screen should look similar to this, but without places saved in the box on the left:

GoogelEarthHomePage
Google Earth Home Page
Search box is in top left corner.

Before we explore Google Earth, now that it’s installed, we need to create a practice folder. I called mine “Passaic, NJ Highlights” because I was born there and lived in Passaic until I was eleven.

1. Choose a name for your folder.
2. Look at the Places box on the left side of your screen. Click on My Places to highlight.
3. Right click and choose Add and Folder.
4. Type in the folder name you have chosen. You can add a description about the folder contents if you like, but this is only a practice folder so it isn’t really necessary. In the future, if you want to add a description, image or link, all you need to do is right click on the folder name, scroll down to Properties and click. The description box will open and you can edit it.
5. Click OK and the folder is now in Places.

We are ready to practice.

I chose to enter Roosevelt #10 School in Passaic, NJ, which was the school I attended. I knew the school was on Harrison Street, but didn’t know the address. It didn’t matter because when I typed in the school name and city, Google Earth gave me the address and I just clicked to choose it. Google Earth zoomed in to the location, which looks like this:

RooseveltSchoolPassaicNJ
Roosevelt #10 School, Passaic, NJ

Notice that there is a site marker at the school location. On the right side of the screen are some directional circles for moving around the map. Below the two biggest circles is a person icon. If you drag that icon to the street where your chosen destination is, you will switch to street view.

Roosevelt#10StreetView
Roosevelt School, Street View

Here is my elementary school, still looking much as I remember it. My kindergarten class was on the first floor, bottom right side and my sixth grade class was on the third floor on the top left hand side. The girls’ playground is seen on the area to the right (where the cars are parked) and the building seen behind the school is actually the school gymnasium, which connects to the main building via a special corridor in the middle of the back side of the second floor.

I’d like to save this address in my Passaic Highlights folder in “My Places.” Here’s what I need to do:

1. Click on my “Passaic Highlights” tour folder to highlight it.
2. Next, click the Placemark button in the Google Earth toolbar.

RooseveltArrowScreenShot
Click on Placemark icon – the yellow push pin

3. Name the Placemark. You can also add a description here if you like.
4. Click OK. It’s now in your folder. If you want to edit the description later on, just right click and go down to Properties, the same way you would edit your folder name.

If you are interested in more detailed information, Lisa’s website is lisalouisecooke.com. While most of the Google Earth tutorials are available to premium (subscription) members, if you go to her website, you can find a “Free Google Earth for Genealogy Video Class.”

There are also free videos on YouTube about using historical maps for genealogy, along with adding images and taking neighborhood tours.